Scratch coding is a fun programming environment made by MIT Media Lab. Now with Scratch 3.0, you can use Scratch anytime, anywhere even with your smartphone. It is a great starting point for beginners ages 8+ to kick-start their coding adventure through block-based coding. The Scratch programming language is incredibly versatile — Scratch blocks can be used for making animations, video games, interactive stories and so on.
Inspired, but not sure where to start? We will show you how to get started on Scratch coding step-by-step. Let’s get our hands dirty.
Part 1: Creating a Scratch Account/Get started
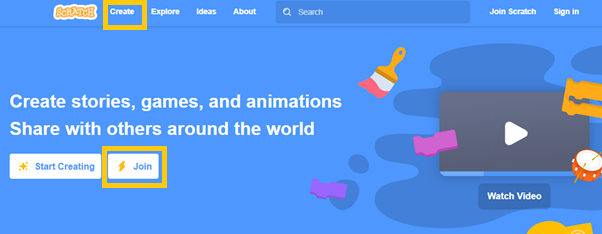
Go to the Scratch main page https://scratch.mit.edu/. Click the "Join Scratch" button on the homepage to create a new account on Scratch.
(Remark: If you are a new user, remember to confirm your email address inside your mailbox. Click "confirm my account" to confirm the account. Confirming your email address will allow you to share projects, comment, and post forums in the Discussion Forums.)
Part 2: Creating and Coding an Easy Project
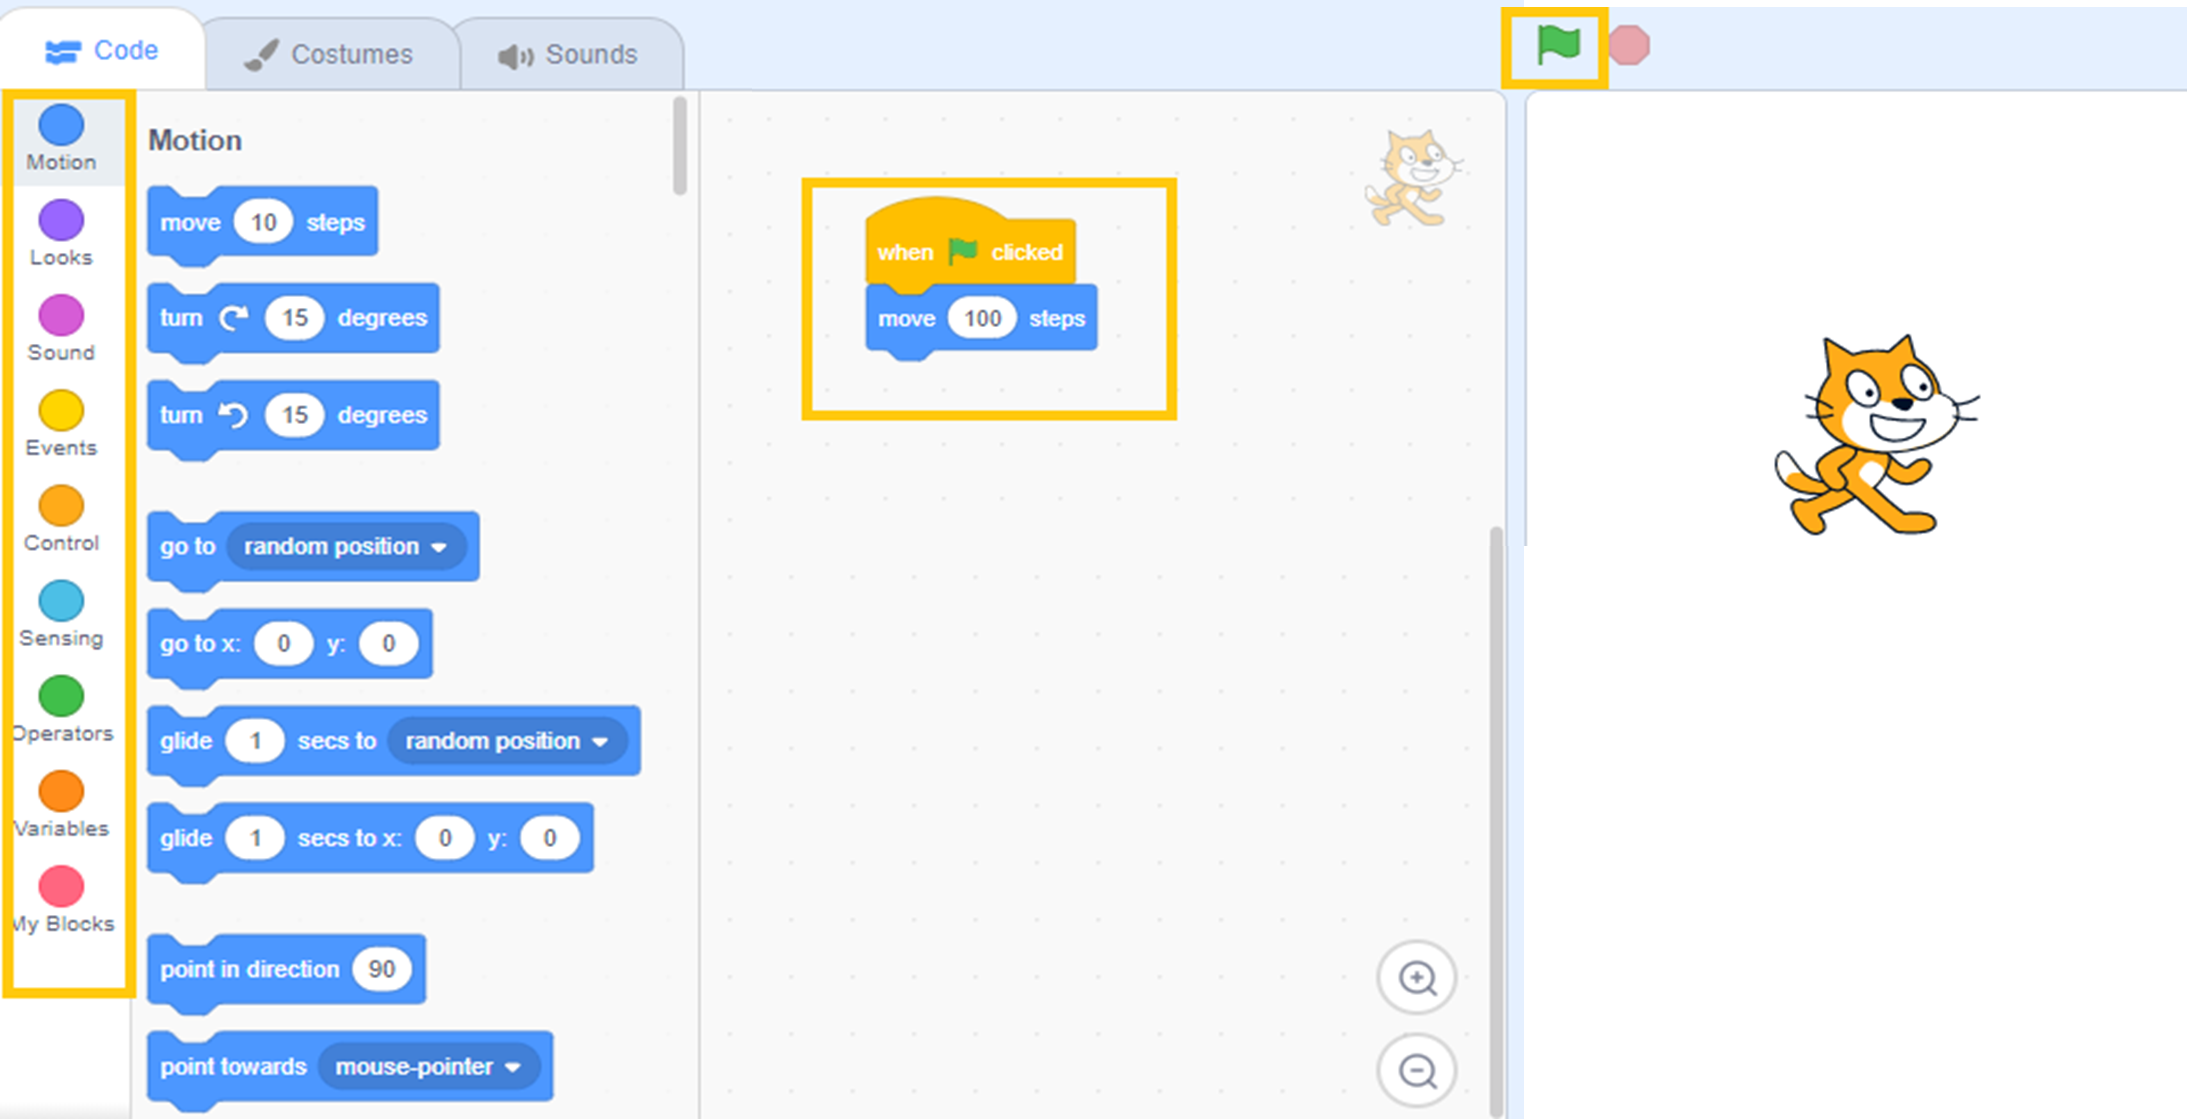
1. Click the “Create” button at the top of your Scratch screen.
2. Understand what each block means. Testing the block combinations is essential to help you learn how it works. (Refer highlighted boxes in the figures below)
3. Drag the blocks in the workspace to code. You can drag the blocks into the workspace of your sprite (eg: space where “move 10 steps” located).
4. Start your project by dragging the "When Green flag Clicked" block into your workspace. Then, drag a "move 10 steps" block and click on the green flag at the top corner of the project. See how the sprite moves. The sprite will move 10 steps forward. Now, try to change the "10" into "100". Notice how the sprite moves more steps. Make the sprite move up and down, or vertically, by changing the "y" axis. Use the "change y by ( )" block. If you want to allow your sprite to move horizontally, change the "x" axis by using the "change x by ( ) block. "
5. Click the green flag to run your project. By clicking on the Green Flag, you will run your code you did. Click on the red stop sign next to the green flag to stop running your project.
6. Use an extension. Click the blue-button at the bottom left to access it. Extensions include pen, translate, and text to speech and many more. Those are extras that can make your project more interesting. (Refer highlighted boxes in the figures below)
7. Share your project. The purpose of scratch is not only to code, but it is also for you to present your projects for everyone! See "project page" to preview your project before sharing.
Inspired, but not sure where to start? We will show you how to get started on Scratch coding step-by-step. Let’s get our hands dirty.
Part 1: Creating a Scratch Account/Get started
Go to the Scratch main page https://scratch.mit.edu/. Click the "Join Scratch" button on the homepage to create a new account on Scratch.
(Remark: If you are a new user, remember to confirm your email address inside your mailbox. Click "confirm my account" to confirm the account. Confirming your email address will allow you to share projects, comment, and post forums in the Discussion Forums.)
Part 2: Creating and Coding an Easy Project
1. Click the “Create” button at the top of your Scratch screen.
- The first thing you see in the sprites section after your new project finishes loading should be a Scratch Cat Sprite. If you want that sprite for your project, leave it. If you want a new sprite, go to the Sprite Library to add a sprite. Or, you can upload a sprite from your device for your project.
2. Understand what each block means. Testing the block combinations is essential to help you learn how it works. (Refer highlighted boxes in the figures below)
- Motion blocks move the sprite. The sprite can move forwards or backward to the direction it is pointing at.
- Looks blocks can make the sprite's costume change, make the sprite speak on the screen, change the size, and it contains other effects, such as ghost and colour effects.
- Sound blocks are used when you are going to add sound to your project.
- Events blocks are the "When green flag Clicked", "When space Key Pressed" blocks, and so on.
- Control blocks allow you to decide whether you want something to repeat. Also, if you want a situation where if something is happening, then this happens in the project, use the if-then blocks.
- Sensing blocks are used when something is "happening". For example, is used when two colours or sprites are touching.
- Operators blocks are the addition, subtraction, multiplication, and division blocks.
- Variables are used when you want for example a score. You can also create a cloud variable when you want something to store in Scratch. (Remark: You can only use the cloud variables once your status changes from a New Scratcher to a Scratcher.)
3. Drag the blocks in the workspace to code. You can drag the blocks into the workspace of your sprite (eg: space where “move 10 steps” located).
- You can make your own blocks. Define what your block will do with coding blocks. Then, you can use your blocks in a project.
- To delete a block, drag it back to the blocks section, hold and then release to delete.
4. Start your project by dragging the "When Green flag Clicked" block into your workspace. Then, drag a "move 10 steps" block and click on the green flag at the top corner of the project. See how the sprite moves. The sprite will move 10 steps forward. Now, try to change the "10" into "100". Notice how the sprite moves more steps. Make the sprite move up and down, or vertically, by changing the "y" axis. Use the "change y by ( )" block. If you want to allow your sprite to move horizontally, change the "x" axis by using the "change x by ( ) block. "
- The When Flag Clicked block is essential for every project. That is the block that runs your code.
- This step is an additional step for beginners to see how the code is put together. As you start, this will all make sense to beginners.
5. Click the green flag to run your project. By clicking on the Green Flag, you will run your code you did. Click on the red stop sign next to the green flag to stop running your project.
- Click on the green flag multiple times during your coding process to see if you have coded what you've wanted. That way, if something goes wrong, you can always go back to your code and check what is it you don't like about it.
6. Use an extension. Click the blue-button at the bottom left to access it. Extensions include pen, translate, and text to speech and many more. Those are extras that can make your project more interesting. (Refer highlighted boxes in the figures below)
- The pen extension is for coding projects that involve the project viewer drawing in your project.
- The text to speech extension allows the sprite to speak. Voices such as squeak and meow are available.
- The translate extension can translate text. You can type the text you want it to translate and the language you want it to translate it to.
7. Share your project. The purpose of scratch is not only to code, but it is also for you to present your projects for everyone! See "project page" to preview your project before sharing.
- You can turn comments off to disable commenting on your project.
- Star and heart your project if you like it.
Five Basic Steps In Creating Scratch Project
Step 1: Making a plan is the first and most important step. It gives your project direction, practices your creativity and computational thinking. Here are the three simple guidelines that will make the process easy:
Example:
Snake Game
Control: Players control character’s movement.
Objective: Collect as many items as possible.
Question Games
Control: Players respond to questions.
Objective: answer questions correctly.
Step 2: Set up the main character. To get started, we will need to create a “Sprite” for our main character. You can choose from a list of premade sprites or customize your game and paint new sprites yourself in the costumes tab or paint editor. You can even upload a picture of yourself if you want to! Next, write code to let the player control it.
Step 3: Pick a backdrop. Let’s first solidify our theme by adding a backdrop but Choosing a fun backdrop helps communicate the theme of your game and makes your game more engaging and immersive.
Step 4: Add an objective. Now, let’s add in the objective to our game. Based on the plan you made earlier, you should already have a rough idea of what you want your objective to be. Different types of games can have vastly different types of objectives.
Step 5: Add more extra features via extensions! Now that you have a controllable character and a working objective, you can still improve it to make it more fun to play.
Step 1: Making a plan is the first and most important step. It gives your project direction, practices your creativity and computational thinking. Here are the three simple guidelines that will make the process easy:
- Pick a theme and set the visual appearance
- Figure out what the player will do
- Pick an objective that the player has to complete
Example:
Snake Game
Control: Players control character’s movement.
Objective: Collect as many items as possible.
Question Games
Control: Players respond to questions.
Objective: answer questions correctly.
Step 2: Set up the main character. To get started, we will need to create a “Sprite” for our main character. You can choose from a list of premade sprites or customize your game and paint new sprites yourself in the costumes tab or paint editor. You can even upload a picture of yourself if you want to! Next, write code to let the player control it.
Step 3: Pick a backdrop. Let’s first solidify our theme by adding a backdrop but Choosing a fun backdrop helps communicate the theme of your game and makes your game more engaging and immersive.
Step 4: Add an objective. Now, let’s add in the objective to our game. Based on the plan you made earlier, you should already have a rough idea of what you want your objective to be. Different types of games can have vastly different types of objectives.
Step 5: Add more extra features via extensions! Now that you have a controllable character and a working objective, you can still improve it to make it more fun to play.
Stay tuned for more tutorial!
Follow our facebook page (fb.me/ZeniusTech888/ and fb.me/nationalroboticsleague/) to get latest news!
Follow our facebook page (fb.me/ZeniusTech888/ and fb.me/nationalroboticsleague/) to get latest news!