- HS ROOF REPAIR SOLUTIONS
- Laman Utama
- Produk (125)
- Berita
- Gambar
- Peta
- Video
- Hubungi
- Statistik Web
- PENGUNJUNG:
Please login to use this feature.
You can use this feature to add the product to your favourite list.
Close
You have added this product to your favorite list.
Check My Favourite
Close
You have removed this product from your favourite list.
Close
Please login to use this feature.
You can use this feature to add the company to your favourites list.
Close
This company has been added successfully.
Check My Favourite
Close
This company has been removed from your favourite list.
Close
Please login to use this feature.
You can use this feature to add the company to your inquiry cart.
Close
This company has been added to your inquiry cart.
Close
This company has been removed from your inquiry cart.
Close
This product has been added to your inquiry cart.
Close
This product has been removed from your inquiry cart.
Close
Maximum number of Product/Company has been reached in inquiry cart.
Close
Daily Login Reward
Congratulations!
You��ve earned your daily login reward for today!
5 NP PointHere are the reward you��ve earned!
Check your Daily Login Rewards
Be sure to come back everyday for more rewards!
Thanks!
06-Sep-2023
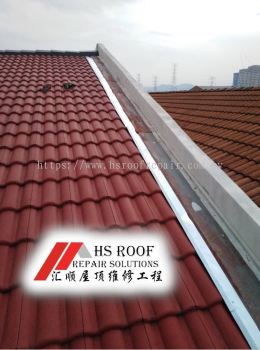
Here's a detailed description of extending roof flashing:
1. Assessment: Before extending roof flashing, a thorough inspection of the existing flashing should be conducted. Identify any signs of damage, deterioration, or gaps that may allow water infiltration. This evaluation is essential to determine the extent of the extension needed.
2. Materials: Gather the necessary materials, including the appropriate type and size of flashing material, roofing cement or sealant, roofing nails or screws, and the required tools such as a hammer, utility knife, tin snips, and a caulking gun.
3. Removal and Cleaning: If there is existing flashing in the area that needs extending, thoroughly clean the area to ensure a clean surface while minimizing any damage to the roof or surrounding materials for the new flashing.
4. Measuring and Cutting: Measure the length and width of the area where the extension is required. Cut the new flashing material to the appropriate size and shape using tin snips. Ensure that the extension covers the vulnerable intersection effectively.
5. Positioning and Attachment: Place the new flashing extension into position, ensuring a snug fit against the existing flashing or roof surface. Secure it using roofing nails or screws, ensuring that it is flush with the roof.
6. Sealing: Apply roofing cement or sealant along the edges and seams of the flashing extension to create a watertight seal. This is crucial to prevent water infiltration and potential leaks.
7. Final Inspection: Conduct a final inspection to ensure that the flashing extension is securely in place, sealed properly, and free from any gaps or defects.
8. Cleanup: Dispose of any waste materials and clean up the work area thoroughly.
Extending roof flashing is a vital step in preserving the integrity of your roof and preventing water damage. Proper installation and sealing are essential to ensure that the roof remains watertight and continues to protect your home or building from the elements.
Hantar mesej anda ke HS ROOF REPAIR SOLUTIONS
Pejabat Utama
HS ROOF REPAIR SOLUTIONS 202003244552 (003162765-V)
KL Traders Square, No.99 Jalan Gombak, Setapak, 53000 Kuala Lumpur, Malaysia.
Tel:
Emel:
Laman Web: https://www.hsroofrepair.com.my
Laman Web: https://hsroofrepair.newpages.com.my/
Laman Web: https://hsroofrepair.onesync.my/
Melayari Melalui : Laman Utama - Klasifikasi - Syarikat - Tempat - Tag - Produk - Berita Baru dan Promosi - Jawatan Kosong - Laman Web Mudah Alih - Google - Keputusan SEO
 US 13472
  GB 10466
  CA 9520
  AU 8748
  IE 6659
  VN 6356
  BR 2423
  NZ 1988


